

Another substantive post about writing an author Wikipedia page. This was first published here on March 31, 2010 and is part of an excellent series by former blogger, Charlotte Phillips.
~~~~
So far, we registered with Wikipedia, wrote our leads, learned about biographies, took the tutorial, and practiced making edits in Wikipedia. Yesterday we wrote the rest of our articles.
Today we put our creations into Wikipedia using the article wizard.
Follow these steps to get to the article wizard:
1. Go to the Wikipedia login page and login.
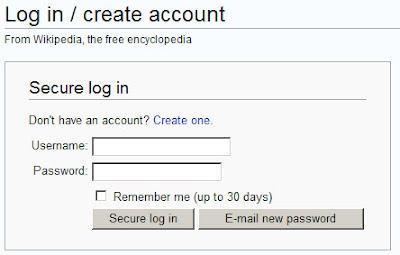
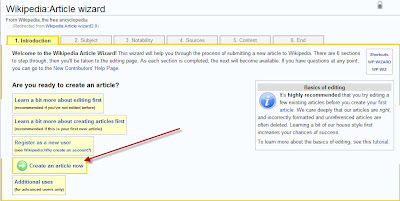
2. Go to the article wizard page and click the Create Article Now button:
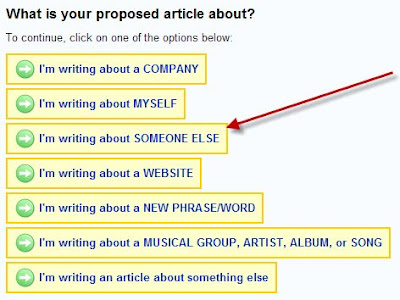
3. Read the intro, then scroll down to the propose article topic area and click the I’m Writing About Someone Else button:
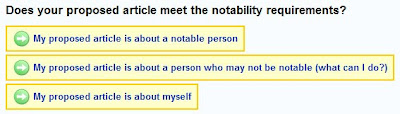
4. Read the definition of notable people, then scroll to the buttons and click My Proposed Article Is About a Notable Person:
5. Read the blurb about reliable and verifiable resources – including the lists in the sidebar. Note: online sources are not listed, but reliable websites are acceptable sources. Reliable websites include news sites, publisher sites, book review sites, writing award sites. The author’s own webpage is not a reliable source. We talked earlier about interviewing your author as a good first step, but information gathered must be verified by independent, reliable sources.
Click My Proposed Article Has Good Sources.
6. Read about copyrights, notability, and neutrality, then click the button labeled My Submission is Neutral.
7. Almost there! You have three options
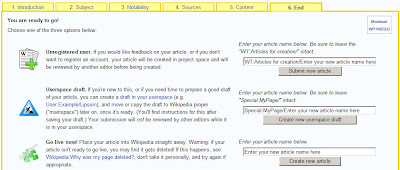
Select the option that best fits your circumstances. I'm selecting the Draft option, so my next steps are:
Your article name should be the name your author is known by – the name that appears on his/her most popular books.
The first view of the editing screen can be intimidating, especially if you haven’t viewed the tutorial or practiced editing other articles. The truth is, the process of creating articles using the wizard is extremely simple. We’re going to take it one line at a time.
If your monitor is small, like mine, you may not see the whole screen, which makes the information at the top even scarier. So scroll down to get a sense of the full window. The top half contains instructions and the bottom half is where we work.
In the top, the first instruction says
That sounds simple – do nothing. Scroll down to the workspace. Does the first line in the big white block look familiar? Don’t Change it.
The next instruction says
Doesn’t sound quite as simple, but it is. Scroll back down to the workspace. The second line in the big white block looks like this:
Those single quote marks are code – the article wizard will read those marks and know
• The words between the marks are the title of your article
• The words between the marks should be displayed in bold in the lead sentence
I’m pretty sure you don’t want the title to be “New article name,” so we’ll change that to the name by which your author is best known. In my case, William G. Tapply.
In the workspace (big white block in bottom half of the window) place your cursor in front of the word New in '''New article name'''. Type the title of your article and delete the words New article name. Your result should look like this:
That’s it – you’ve completed your lead.
The next help provided by the wizard concerns reference tags and external links. What about the rest of the article? It appears, we are somewhat on our own. However, by completing the tutorial and peeking at the edit tabs of different articles, we have learned some things about formatting.
Next step is to create a heading for the first chunk of information.
You have a choice of four levels. Open the Quick Reference Cheat Sheet and scroll down to section headings. The format is defined in the center and off to the right, the result is displayed. I want my first heading to be at level one so it looks like this:
After the heading, place the associated text.
So now my draft looks like this:
My next chunk of information is about my authors published work. I want a heading and two sub-headings. The format:
I could simply list everything under the heading of Published Work, but the cheat sheet says “A Table of Contents will automatically be generated when four headings are added to an article.” I want a table of contents, so I subdivided the information. This works for Mr. Tapply because he published so much work in multiple categories. This approach may not make sense for an author with one entry in each sub-group.
Let’s talk about those lists. If you’ve been studying the reference pages provided this week, you already know, there is no standard way to provide a list of published work. In the examples we’ve viewed,
We will focus on the numbered list and bulleted list. Both forms are presented on the Quick Reference Cheat Sheet. If you are interested in a different form, go to a page that uses that form and click on the edit tab to see how it was done.
I’m going to use Tapply’s Stoney Calhoun novels for my examples. To create a numbered list, I would type:
On the published page, this will look something like:
To create a compound list, simply modify the list. For example:
Will result in:
In this last example, I could replace the ## symbols with a single asterisk:
and the result would be something like:
My draft list looks like this:
== Published Work ==
Can you figure out what it will look like? To see how your page will display, scroll down below the big white box and click on the Show Preview button. When you finish oohing and ahhing over your masterpiece, scroll back to the work box. We need to complete our draft and save our work.
Before we save our drafts, let’s add one external link and one category so we have those for future reference.
Go to the external links area in the big white box. You’ll see:
We will replace http://www.example.com/ with the address of an external site and replace example.com with the words we want to display on the page.
So, if I type:
The asterisk will display as a bullet.
The left “[“ and right “]“ brackets will tell Wikipedia this is an external link.
Because Wikipedia knows this is a link, http://www.williamgtapply.com/ will not display, but “William G. Tapply home page” will.
When readers click on William G. Tapply home page, the contents of http://www.williamgtapply.com/ will display.
Now scroll down until you can see the Edit summary field. Put your cursor in the white rectangle and type a note about what you’ve done – in my case, created the first draft.
Click the Save Page button.
Note: I hung out on this page too long, so first I received a prompt that said Wikipedia couldn’t save, but to try again. I clicked on Save a second time and was presented with one of those annoying fuzzy letter boxes. I managed to feed back the correct letters and my draft was saved.
Next time, we figure out how to find our saved work, how to add categories, how to shore up notability, and how to release to the Wikipedia world. For a sneak peak, check out http://en.wikipedia.org/wiki/Wikipedia:So_you_made_a_userspace_draft
Helpful links:
Help
New Contributors Help Page
Your First Article
Quick Reference Cheat Sheet
http://en.wikipedia.org/wiki/Wikipedia:So_you_made_a_userspace_draft

~~~~
So far, we registered with Wikipedia, wrote our leads, learned about biographies, took the tutorial, and practiced making edits in Wikipedia. Yesterday we wrote the rest of our articles.
Today we put our creations into Wikipedia using the article wizard.
Follow these steps to get to the article wizard:
1. Go to the Wikipedia login page and login.

2. Go to the article wizard page and click the Create Article Now button:

3. Read the intro, then scroll down to the propose article topic area and click the I’m Writing About Someone Else button:

4. Read the definition of notable people, then scroll to the buttons and click My Proposed Article Is About a Notable Person:
5. Read the blurb about reliable and verifiable resources – including the lists in the sidebar. Note: online sources are not listed, but reliable websites are acceptable sources. Reliable websites include news sites, publisher sites, book review sites, writing award sites. The author’s own webpage is not a reliable source. We talked earlier about interviewing your author as a good first step, but information gathered must be verified by independent, reliable sources.
Click My Proposed Article Has Good Sources.
6. Read about copyrights, notability, and neutrality, then click the button labeled My Submission is Neutral.
7. Almost there! You have three options
- Submitting your article to someone else to review (a good choice if this is your first ariticle and you are ready to create the entire article in one go,
- Creating your article live in Wikipedia (not recommended for first timers, but a valid option if you are confident in your work), and
- Creating a workspace for your draft.
Select the option that best fits your circumstances. I'm selecting the Draft option, so my next steps are:
- follow the instructions to correctly enter your article name in the data entry field, then
- click the Create New Userspace Draft button.
Your article name should be the name your author is known by – the name that appears on his/her most popular books.
The first view of the editing screen can be intimidating, especially if you haven’t viewed the tutorial or practiced editing other articles. The truth is, the process of creating articles using the wizard is extremely simple. We’re going to take it one line at a time.
If your monitor is small, like mine, you may not see the whole screen, which makes the information at the top even scarier. So scroll down to get a sense of the full window. The top half contains instructions and the bottom half is where we work.
In the top, the first instruction says
Don't change the text {{Userspace draftdate={{subst:CURRENTMONTHNAME}}Don't worry if it makes no sense to you. This is needed!
{{subst:CURRENTYEAR}}}}.
That sounds simple – do nothing. Scroll down to the workspace. Does the first line in the big white block look familiar? Don’t Change it.
The next instruction says
Replace New article name with the name of the article, leaving the ' ' ' format
marks intact.
Doesn’t sound quite as simple, but it is. Scroll back down to the workspace. The second line in the big white block looks like this:
'''New article name''' is
Those single quote marks are code – the article wizard will read those marks and know
• The words between the marks are the title of your article
• The words between the marks should be displayed in bold in the lead sentence
I’m pretty sure you don’t want the title to be “New article name,” so we’ll change that to the name by which your author is best known. In my case, William G. Tapply.
In the workspace (big white block in bottom half of the window) place your cursor in front of the word New in '''New article name'''. Type the title of your article and delete the words New article name. Your result should look like this:
'''William G. Tapply''' isNow we just need to add the rest of the lead. If your lead begins with your author’s name, just replace the word is with the rest of your lead. Mine looks like this:
'''William G. Tapply''' (1940 - July 28, 2009), an American author lso known as Bill Tapply, and best known for his Brady Coyne mystery novels, penned more than forty books during his twenty-five year novel writing career and nearly a thousand magazine articles during his lifetime. He was a Contributing Editor for Field & Stream and a columnist for American Angler. With his wife, author Vicki Stiefel, he ran The Writers Studio at Chickadee Farm from which they mentored young writers.
That’s it – you’ve completed your lead.
The next help provided by the wizard concerns reference tags and external links. What about the rest of the article? It appears, we are somewhat on our own. However, by completing the tutorial and peeking at the edit tabs of different articles, we have learned some things about formatting.
Next step is to create a heading for the first chunk of information.
You have a choice of four levels. Open the Quick Reference Cheat Sheet and scroll down to section headings. The format is defined in the center and off to the right, the result is displayed. I want my first heading to be at level one so it looks like this:
== Biography ==
After the heading, place the associated text.
So now my draft looks like this:
'''William G. Tapply''' (1940 - July 28, 2009), an American author also known as Bill Tapply, and best known for his Brady Coyne mystery novels, penned more than forty books during his twenty-five year novel writing career and nearly a thousand magazine articles during his lifetime. He was a Contributing Editor for Field & Stream and a columnist for American Angler. With his wife, author Vicki Stiefel, he ran The Writers Studio at Chickadee Farm from which they mentored young writers.
== Biography ==
William G. Tapley, born in Waltham, Massachusetts, grew up in Lexington, Massachusetts where he graduated from Lexington High School. He added a B.A. from Amherst College and an M.A.T. from Harvard to his arsenal before launching his first career as a teacher Lexington High School, where he worked for nearly twenty-five ears….
My next chunk of information is about my authors published work. I want a heading and two sub-headings. The format:
== Published Work ==
William G. Tapply’s work includes…rest of text goes here
=== Novels ===
List goes here
=== Non-fiction Works ===
List goes here
I could simply list everything under the heading of Published Work, but the cheat sheet says “A Table of Contents will automatically be generated when four headings are added to an article.” I want a table of contents, so I subdivided the information. This works for Mr. Tapply because he published so much work in multiple categories. This approach may not make sense for an author with one entry in each sub-group.
Let’s talk about those lists. If you’ve been studying the reference pages provided this week, you already know, there is no standard way to provide a list of published work. In the examples we’ve viewed,
- Nevada Barr’s list is in a table,
- Ernest Hemingway’s work is provided in sub-heading form, with paragraphs of information about each work,
- Robert Crais’s list is really a compound list – a numbered list of novels and under each title, a bulleted list of awards
- Linda Barnes’s books are presented in simple bullets.
We will focus on the numbered list and bulleted list. Both forms are presented on the Quick Reference Cheat Sheet. If you are interested in a different form, go to a page that uses that form and click on the edit tab to see how it was done.
I’m going to use Tapply’s Stoney Calhoun novels for my examples. To create a numbered list, I would type:
Stoney Calhoun Mystery Novels
# Bitch Creek, The Lyons Press, 2004.
# Gray Ghost, St. Martin's Press , 2007.
# Dark Tiger, 2009
On the published page, this will look something like:
Stoney Calhoun Mystery NovelsTo create a bulleted list, I would replace # with *.
1. Bitch Creek, The Lyons Press, 2004.
2. Gray Ghost, St. Martin's Press , 2007.
3. Dark Tiger, 2009
To create a compound list, simply modify the list. For example:
# Stoney Calhoun Mystery Novels
## Bitch Creek, The Lyons Press, 2004.
## Gray Ghost, St. Martin's Press , 2007.
## Dark Tiger, 2009
Will result in:
1. Stoney Calhoun Mystery Novels
1.1 Bitch Creek, The Lyons Press, 2004.
1.2 Gray Ghost, St. Martin's Press , 2007.
1.3 Dark Tiger, 2009
In this last example, I could replace the ## symbols with a single asterisk:
# Stoney Calhoun Mystery Novels
* Bitch Creek, The Lyons Press, 2004.
* Gray Ghost, St. Martin's Press , 2007.
* Dark Tiger, 2009
and the result would be something like:
1. Stoney Calhoun Mystery Novels
• Bitch Creek, The Lyons Press, 2004.
• Gray Ghost, St. Martin's Press , 2007.
• Dark Tiger, 2009
My draft list looks like this:
== Published Work ==
William G. Tapply’s work includes…rest of text goes here
=== Novels ===
Stoney Calhoun Mystery Novels
* Bitch Creek, The Lyons Press, 2004.
* Gray Ghost, St. Martin's Press , 2007.
* Dark Tiger, 2009
===
Non-fiction Works ===
List goes here
Can you figure out what it will look like? To see how your page will display, scroll down below the big white box and click on the Show Preview button. When you finish oohing and ahhing over your masterpiece, scroll back to the work box. We need to complete our draft and save our work.
Before we save our drafts, let’s add one external link and one category so we have those for future reference.
Go to the external links area in the big white box. You’ll see:
== External links ==
* [http://www.example.com/ example.com]
We will replace http://www.example.com/ with the address of an external site and replace example.com with the words we want to display on the page.
So, if I type:
* [http://www.williamgtapply.com/ William G. Tapply home page],
The asterisk will display as a bullet.
The left “[“ and right “]“ brackets will tell Wikipedia this is an external link.
Because Wikipedia knows this is a link, http://www.williamgtapply.com/ will not display, but “William G. Tapply home page” will.
When readers click on William G. Tapply home page, the contents of http://www.williamgtapply.com/ will display.
Now scroll down until you can see the Edit summary field. Put your cursor in the white rectangle and type a note about what you’ve done – in my case, created the first draft.
Click the Save Page button.
Note: I hung out on this page too long, so first I received a prompt that said Wikipedia couldn’t save, but to try again. I clicked on Save a second time and was presented with one of those annoying fuzzy letter boxes. I managed to feed back the correct letters and my draft was saved.
Next time, we figure out how to find our saved work, how to add categories, how to shore up notability, and how to release to the Wikipedia world. For a sneak peak, check out http://en.wikipedia.org/wiki/Wikipedia:So_you_made_a_userspace_draft
Helpful links:
Help
New Contributors Help Page
Your First Article
Quick Reference Cheat Sheet
http://en.wikipedia.org/wiki/Wikipedia:So_you_made_a_userspace_draft
A great series, Charlotte. Thank you for taking the time (and I know it must have taken a lot of time!) to put this together for us.
ReplyDeleteHelen
OMG, Char! This is so awesome. Let's put these into the sidebar with direct links to each article in the series. You are turning this into an ebook, aren't you?
ReplyDeleteThank you!
Dani
Finally instructions that even I can follow! I don’t have an article ready so I’m bookmarking this for future use. Thanks.
ReplyDeleteHelen,
ReplyDeleteYes - but it was worth it. I've wanted to learn about writing for Wikipedia for a long time. Now I know enough to be dangerous:-).
Charlotte
Dani,
ReplyDeleteI haven't decided about an e-book yet. So much of the info is available on Wikipedia, but it took me hours/days to find it all. I had to wade through quite a bit that I eventually tossed aside. So, some days I lean toward the ebook and some days I run in the other direction.
Charlotte
Dani,
ReplyDeleteI like the sidebar idea. Did you notice that I need one more post? I left everyone with their articles in draft - which means no one can see them...
Charlotte (elipsis just for you)
This is an amazing deconstruction of the writing process which has revolutionized the encyclopedia.
ReplyDeleteI did, Char, but I'm leaving it in your hands... hehe.
ReplyDeleteDani
This is awesome Char! Thank you.
ReplyDeleteElle
HearWriteNow
Blood-Red Pencil
Wow - this is a blast from the past. Did anyone use this the first time around to create an article? If yes, post a link so we can read your wiki work.
ReplyDeleteI hope the instructions are still valid. One thing that's constant at wikipedia is change.
Charlotte
Oops, I didn't check. I suppose someone will let us know if there is a problem.
ReplyDelete